How to Draw a Goldendoodle (Step by Step)
Are you a lover of the Goldendoodle, and do you love to draw and paint? If so, this Goldendoodle project is perfect for you. If you’re looking for a way to create a portrait of your favorite fun-loving animal, you don’t have to be Leonardo da Vinci.
Get the right materials, follow these tips and step-by-step instructions, and get immersed in a work of art with confidence! Our video and step by step guide will show you how to draw a Goldendoodle. Soon, you’ll have a masterpiece to decorate your space with a reminder of this adorable little breed.

The Goldendoodle
The Oodle world has the cutest dogs around, but the Goldendoodle takes the cake. This dog breed is a cross between a Golden Retriever and a Poodle. They all have unique colors and either straight or curled coat types with different kinds of wavy textures.
These easy-going, happy-go-lucky dogs are just so adorable that you will want to have something to look at them, even when they aren’t around. Fortunately, they are quite easy to draw. Before beginning this project, these helpful tips will set you up for success.
What Paint Colors Should I Use?
Goldendoodles come in a variety of brown tones. Pick a variety of shades of browns, yellows, and black. Remember that darker paint colors give your painting depth.
What Should I Draw With?
Start by choosing a drawing paper suited for a variety of drawing and art media. You might want to try a pencil, charcoal, pencil crayons, or even graphite to outline your Goldendoodle before you paint it. If you choose acrylic paint or watercolor, you want to choose thicker paper. Watch out for textured paper; it sucks paint into the divots. Be sure to choose something that compliments the texture of your Goldendoodle.
What Should I Paint With?
If you are just starting to paint, then acrylic or oil paints are most recommended to sketch a doodle pup. If you are up for a challenge and are comfortable using blending techniques, try using watercolors. Whichever paint you choose, be sure to choose the compatible paper. You do not need a large range of colors to start; stick to black, browns, and yellows to begin, then integrate additional colors for the collar if you would like.
What If I’m Not a Confident Artist?
All artists can experience some self-doubt, and that can be discouraging. Whether you are just starting or have been an artist for years, this Goldendoodle is the perfect project. Be confident in your abilities, find a calming environment and be prepared.
Have everything you need close by and set the tone in the environment. Put on some music and enjoy the process, not just the end product. When you are calm and relaxed, your lines and strokes will come out much more natural. Here’s how to draw a Goldendoodle, step-by-step.
Outlining The Head and Body
Gather your materials, do some wrist and finger stretches, and buckle down for some sketching!
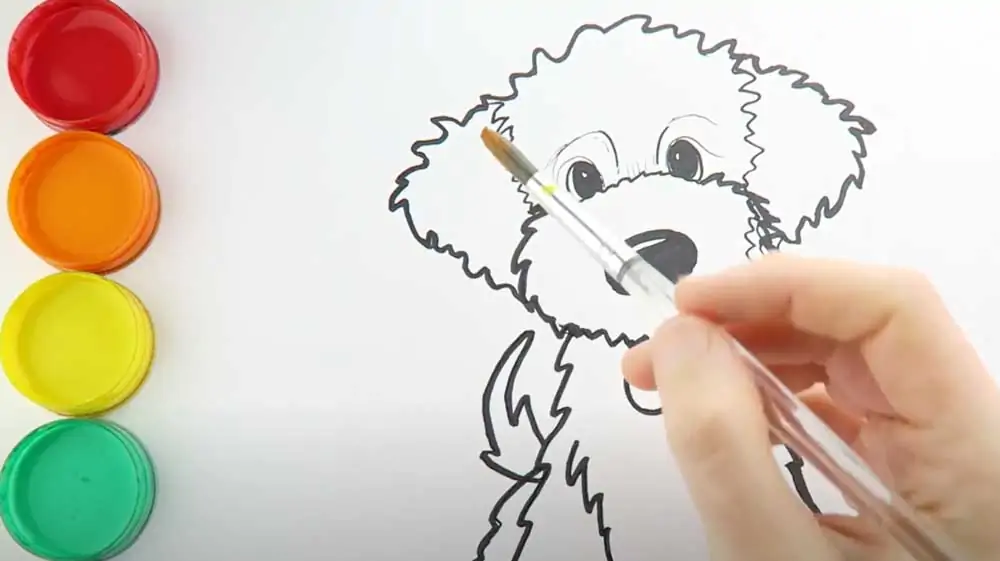
Step 1.
Start with the head. Draw a slightly curved and wavy line carrying from one jay line to the other, with a slight peak at the top, in the middle. Allow your pencil or marker to lift slightly as you outline the head in the wavy line, giving it a natural, textured look. Leave an open space at the neck.
Step 2.
Draw two curved lines facing outwards from each other to represent the eyebrows, giving your Goldendoodle a curious expression. Continue with oval shapes on the exterior of the eyebrows for the eyes. Leave a slight opening at the bottom of each eye and draw two small circles to represent the pupils inside the opened ovals.
Step 3.
Holding the pencil or marker loosely in your hand, draw wavy lines from both sides of the peak in the top of the head downwards, to the middle of the face, just under the eyes. These wavy lines give your Goldendoodle a textured appearance. At the base of each of these wavy lines begin to curve two more wavy lines from the eye to the chin. Attach these curved lines at the base of the eyes, along the bridge of the nose.
Step 4.
Underneath the eyes, yet inside the curved, wavy lines, draw a horizontal oval for the nose. It doesn’t have to be perfect. Imperfections are key to making your drawing look more realistic (it will still look like a cute dog). Place another thin, circular oval at the top of the nose, giving it a wet appearance.
Step 5.
Begin at the base of the chin and draw a wavy line on both sides to the base of the dog, expanding out, almost giving it a triangular formation, so the dog looks like it is sitting. Carry each line upwards at its base to form two wavy paws.
Step 6.
By loosely holding your pencil or marker, draw a wavy u-shaped pouch to represent the body and connect both paws. Don’t carry this wavy line to the bottom where the paws are, keeping it about a half-inch off to give it a shorter appearance and distinguishes the paws from the body.
Step 7.
Continue with completing the head. Finish that jaw line by creating another wavy line underneath the nose to finish in the head.
Step 8.
Directly under the jawline, draw one small circle and another larger circle below it with overlap to represent the dog’s collar. Be creative if you want and give it a name.
Step 9.
On the left-hand side, you are going to draw a leaf-shaped tail by drawing two smaller waves on the sides and one larger tip directly in the middle. Consider giving your tail a slight curve to add to the dog’s curious character.
Step 10.
Directly below the tail, you will carry one wavy line outwards towards the ground, just behind the other paw. This will become the dog’s back leg.
Step 11.
At the base of your Goldendoodle, finish it off with a wavy line, outlining all of the paws. This adds to the three-dimensional look and brings it to life.
The Fine Details
Now, you will want to add a little depth to your masterpiece.
Step 12.
Use a dark color (black is recommended) to color in the nose but leaving that thin oval white, giving it a wet appearance-color black inside the eyes, leaving the pupil white. Outline the head, ears, and circular mouth and jawline in black. Don’t worry if your wavy lines are not exactly over your previous drawing; this adds to your dog’s uniqueness. Continue to outline the wavy lines on the dog’s body, tail, and collar in black. You do need this definition – it is why drawing a black Goldendoodle dog is super tricky. How can you get the definition?
Step 13.
Use a thinner pencil or marker now just above the eyeballs and draw fine lines to give the appearance of eyelashes or eyebrows.
Now it’s Time to Paint!
This is where we get messy!
Step 14.
Take a fine paintbrush and pick your favorite shade of brown. Start by painting in the ears. Try to allow your brush strokes to resemble the wavy dog fur (like that of an F1b Goldendoodle).
Step 15.
Choose a lighter brown to pain in the forehead and nose, leaving the eyes and nose black or dark. Try to pick a light enough brown so that the thin eyebrows peak through. Carry that light brown color down to the body, the paws, and the tail.
Step 16.
Pick a vibrant color, like purple or red, for the collar. An adorable doodle of a cute doodle!
Step 17.
Add some texture to your dog by using a thin paintbrush and a little bit of a darker shade of brown. Start between the eyes and draw upwards towards the top of the head, creating the look of fine hair. Add these thin lines on the side of the eyes to create the look of eyelashes. Carry these thin lines around the snout, going whichever direction you feel is right, adding to the textured look.
Step 18.
Fill the head and snout in completely with these thin, slightly darker lines, covering your dog in fur. Paint thin, slightly darker lines on the base of the body, the tail, and the paws, moving downwards towards the bottom of your dog, giving the fur a natural downward appearance.
Step 19.
Fill in the wavy line below the body and the paws in a dark color with something dark, like black. Be sure to paint right up to the body and follow along the previously outlined wavy lines.
Final Touches
We are almost there! A few little adjustments to make your cute puppy perfect.
Step 20.
Bring your fine paintbrush, dipped in black paint, back up to outline the eyes and nose again, now that the paint is beginning to dry a bit. Outline the jawline and the collar to make them pop. Outline the body, the tail, and the paws so that the black wavy outlines contrast against the brown fur.
Step 21.
Dip a thin paintbrush in a slightly darker brown to outline the fine hairs above and beside the eyes. Add a few stray brown hairs here and there, and voila, your masterpiece is complete.
Conclusion
These easy step-by-step instructions can make anyone an artist. We hope you enjoyed learning how to draw a Goldendoodle and are eager to share your masterpiece with your friends and family.
Drawing a Double Doodle, Poodle or Labradoodle is a similar process – just change the dimensions slightly.